Diamond painting has become a popular craft in recent years and for good reason! It’s a relaxing and satisfying hobby that allows you to create beautiful works of art with small, colorful diamonds. If you’re new to diamond painting, you might be wondering what you need to get started. In this article, we’ll cover everything you need to know about diamond painting kits.
What is a Diamond Painting Kit?
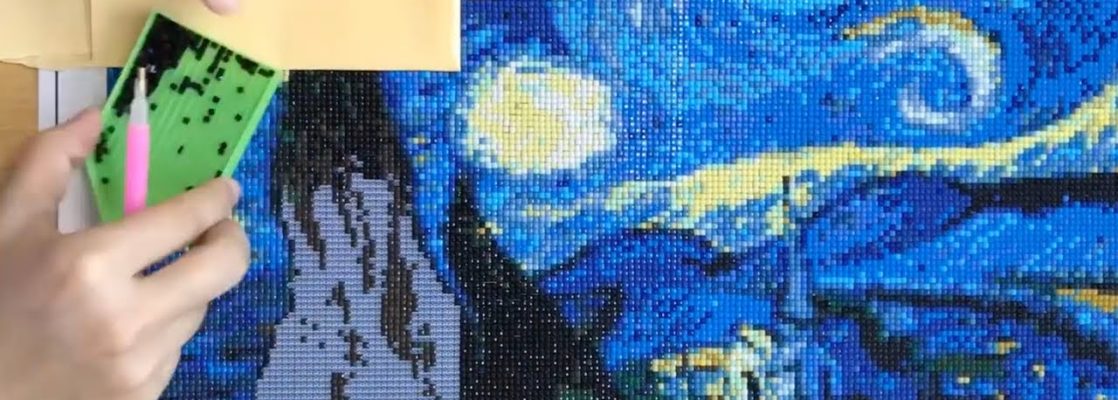
A diamond painting kit includes everything you need to create the best diamond painting kits. It typically includes a canvas with a printed design, small resin diamonds in various colors, a diamond applicator pen, a tray to hold the diamonds, and a small amount of glue or wax. Some kits may also include tweezers, a light pad, or a frame.
Choosing a Kit
When choosing a diamond painting kit, there are a few things to consider. First, consider the design. There are countless designs available, from landscapes and animals to famous works of art and portraits. Choose a design that you love and that matches your skill level. Some designs may be more challenging than others, so it’s important to start with something that you feel comfortable with.
Next, consider the size of the canvas. Larger canvases will have more detail, but they may take longer to complete. Smaller canvases are great for beginners or for those who want a quicker project.
Finally, consider the quality of the kit. Look for kits that use high-quality materials, including a canvas with a clear and accurate print and diamonds that are evenly sized and shaped.
Getting Started
Once you’ve chosen your diamond painting kit, it’s time to get started! Here’s a step-by-step guide:
- Lay out all of the materials and make sure everything is included.
- Choose a comfortable and well-lit workspace.
- Place the diamonds in the tray, with each color in a separate compartment.
- Dip the diamond applicator pen into the glue or wax, and then pick up a diamond by placing the pen tip onto the diamond’s flat side.
- Place the diamond onto the corresponding symbol on the canvas.
- Continue to place diamonds onto the canvas, working in small sections.
- Once you’ve completed a section, use a rolling pin or similar tool to press down on the diamonds to ensure they’re securely attached.
- Continue until the entire canvas is covered in diamonds.
Tips and Tricks
To make your diamond painting experience more enjoyable, here are some tips and tricks to keep in mind:
- Work in a well-lit area to make it easier to see the symbols on the canvas.
- Use a light pad to make the symbols even clearer.
- Take breaks often to prevent eye strain and to give your hands a rest.
- Keep your workspace clean and organized to prevent diamonds from getting lost or mixed up.
- Frame your finished diamond painting to display it as a beautiful piece of art.
In conclusion, diamond painting kits include everything you need to get started with this popular craft. With the right kit and a little patience, you can create beautiful works of art that you’ll be proud to display.